
The best small backyard stepping stone ideas follow the line people already walk. Choose stones at least 16 to 18 inches across, start with centers about 24 inches apart, and cut cardboard templates to walk both ways with a watering can before you buy. Give the gate and patio ends a bigger landing, and if the path carries wheels or wet shade, switch to a continuous path instead.
A neat line of stones from the patio can still leave you lunging at the gate with a full watering can. The pattern matters less than you’d think. What makes a small path easy is where your feet land, plus how the last stone meets the lawn, gravel or step beyond it.
The good news: you can test almost all of that with cardboard in an afternoon, before spending a dollar on stone.
Recommended products for testing a stepping-stone path


Recommended blogs
- Small patio ideas that leave room to live
- Long narrow backyard ideas that make the whole space usable
- Small townhouse backyard ideas for a plan that fits real life
- Muddy small backyard ideas that solve the right problem first
- Small backyard garden paths that connect every destination
12 surface ideas with real character
Once the line works, have fun with the surface. In a yard under 500 square feet, a path of 8 to 15 stones is typical, so every one of them is on show.
1. A brick border around quiet paving
Pale square pavers, about 18 to 24 inches, each framed by a single row of red brick, give a short path a settled, garden-room look. The warm outline does the decorating, so the stone itself can stay plain.
It suits a formal or cottage-style yard near the house. Brick borders take more time to lay, and every brick has to sit level with the stone, or toes will find the edge.
2. Gravel edges and easy stepping pads
Large flat pads set into a bed of gravel make one of the easiest backyard stone path ideas to live with. Gravel close in color to the stone reads as a nearly continuous floor; a darker mix makes each pad stand out.
Use 3/8-inch crushed gravel rather than round pea gravel, which rolls underfoot and wanders. About 2 inches deep is plenty, and one cubic yard covers roughly 160 square feet at that depth.
3. Broad pavers for a calmer floor
Fewer, bigger stones make a compact yard feel less fussy. Rectangles around 18 by 30 inches, all turned the same way across the path, look orderly and leave room for a whole foot with a bit to spare.
Large concrete pavers in this size often weigh 60 pounds or more each, so plan on two people for setting them. They also cost more per stone, usually $15 to $40.
4. Mixed sizes in a whisper-soft palette
An irregular stepping stone path in chalk, oatmeal and soft gray holds different shapes together without looking patchy. Natural flagstone steppers, usually $10 to $30 each, give that loose, collected look.
Put the biggest pieces at turns and stopping points and the smaller ones on straight runs. Check that even the smallest stone is at least 14 inches across, so nobody has to land on a sliver.
5. Green joints where feet never land
Stepping stones with ground cover between them knit a path into the garden. Creeping thyme suits a sunny path in zones 4 to 9; Irish moss or blue star creeper handles part shade.
Keep the gaps to about 3 to 6 inches so feet land on stone, not plants. Even tough groundcovers take light traffic only, and they usually need a season or two to fill in.
6. A stepping-stone trail to the chair
A broad final landing, around 30 by 30 inches, makes a reading chair at the end of the yard feel like a place you arrive at. Let the earlier stones approach in a simple line, then widen at the end so you can turn and sit.
I’d echo one material from the seating corner, such as terracotta or warm timber, so the trail and the destination feel related without matching exactly.
7. A threshold stripe that says welcome
One contrasting slab right outside the back door, charcoal against pale paving or warm clay beside gray, acts like a tiny front stoop. Make it the full width of the door, roughly 36 inches, and about 24 inches deep.
Line it up squarely with the doorway so the way forward is obvious. It works best where the door opens onto lawn or gravel rather than an existing patio.
8. A gentle curve beside the greenery
A curved stepping stone path that follows the edge of a leafy bed makes an everyday walk feel less like a corridor. Rotate each stone only slightly, about 10 to 15 degrees from the last, so the bend stays smooth.
Keep the curve shallow. If it bows out more than a couple of feet from the straight line, people will cut the corner and wear a muddy track through the planting.
9. One reclaimed detail with a past
An old millstone, a salvaged granite curb piece or a single patterned tile slab looks deliberate when it appears once, at a turn or the arrival point. Surround it with plainer stones so it has room to be noticed.
Check that it sits flat and isn’t glazed or polished, which gets slick when wet. Reclaimed pieces vary in thickness, so expect to dig each bed to suit.
10. A pale grid with graphic lines
Light square pavers, perhaps 16 or 24 inches, with even dark joints of 2 to 3 inches give a crisp, modern pattern against loose foliage. Black Mexican beach pebbles or dark gravel make the lines.
Grids are unforgiving: one stone out of line shows from the kitchen window. Use a string line and keep the joint widths identical.
11. Pavers that point toward the view
Turn rectangular pavers so their long sides run toward a flowering pot, a small tree or a bench. The direction is subtle, but it pulls the eye down the yard and makes a short plot feel longer.
This works best in long, narrow yards and side passages. Finish with a wider landing at the destination so the path ends with somewhere to stand.
12. Backyard stepping stone, up close
Up close is where the stone itself matters: exposed aggregate, faint veining in bluestone, a gently riven slate face. Texture is also practical, since it grips better in rain than a smooth, sealed face.
Buy one sample, set it beside the patio and planting for a week, and wet it with the hose. If it looks good dry and wet, and doesn’t feel slick, it’s a keeper.
Decide what the path must do
Name where it starts and where it ends before choosing a stone. A path you stroll twice a week to look at flowers can be playful; a daily trip from the back door to the gate with the trash cart needs to be direct and solid.
List the users and carried loads
Think about who walks it: kids hopping, a grandparent who steps carefully, a dog who cuts across. Then list what gets carried. A 2-gallon watering can, a laundry basket or a bag of compost all shorten your stride and hide your feet from view, so test with the most awkward ordinary load.
Decide when stepping stones are the wrong path type
Skip stepping stones where wheels roll every week, where the slope is steeper than a gentle grade, or where someone uses a cane, walker or wheelchair. A standard 96-gallon trash cart is roughly 2 feet wide and bounces across gaps, so a bin path should be continuous and about 36 inches wide. If anyone’s mobility shapes the walk, get advice from an occupational therapist or a qualified landscape pro before building.
Walk the path before drawing it
Walk between the real start and end points 5 to 10 times, at different times of day, and push a marking flag in wherever your feet turn or stop. That line usually differs from the one that looks pretty from the window, and it’s the one people will keep using.
Mark the natural desire line
Note the gate swing, any narrow side passage, drains, planting and the spots where a hose has to pass. Worn grass is the best evidence you’ll get. In a passage under about 4 feet wide, keep side-yard access clear with a straight line of stones rather than a decorative bend.
Protect the main seating area
Pull the chairs out as they’re really used, usually 24 to 36 inches back from the table. A path that clips chair legs or sends muddy shoes across the sitting area isn’t worth it. Bend it around the outside of the seating instead.
Make full-size templates of the exact candidate stones
Trace the listed size or a real stone onto cardboard, cut the true outline (irregular flagstone included) and make enough to lay the whole path. A 24 by 36 inch sheet yields two 16-inch rounds or one 24-inch square. One sample can’t show you the awkward last step; the full set can.
Lay the templates from both directions
Start at the patio and finish at the gate, then pick them up and start from the gate. Whichever end you start from tends to feel right, and the leftover gap lands at the other. Fix forced jumps and half-steps by adding a stone or switching to a bigger one, not by hiding a bad gap at one end.
Test a straight route and one deliberate curve
Try the direct line first. Add a curve only where it steps around a real obstacle, like a tree, a downspout or a planted bed, or reaches the destination more naturally. Walk each layout and compare how it feels underfoot, not how it looks from above.
Check each step, pause, and transition
Have everyone who uses the path walk the templates both ways, once at a normal pace and once slowly, and then again carrying something. Watch where feet actually land. Most adults are comfortable with stone centers about 22 to 26 inches apart, but children and careful walkers often want them closer.
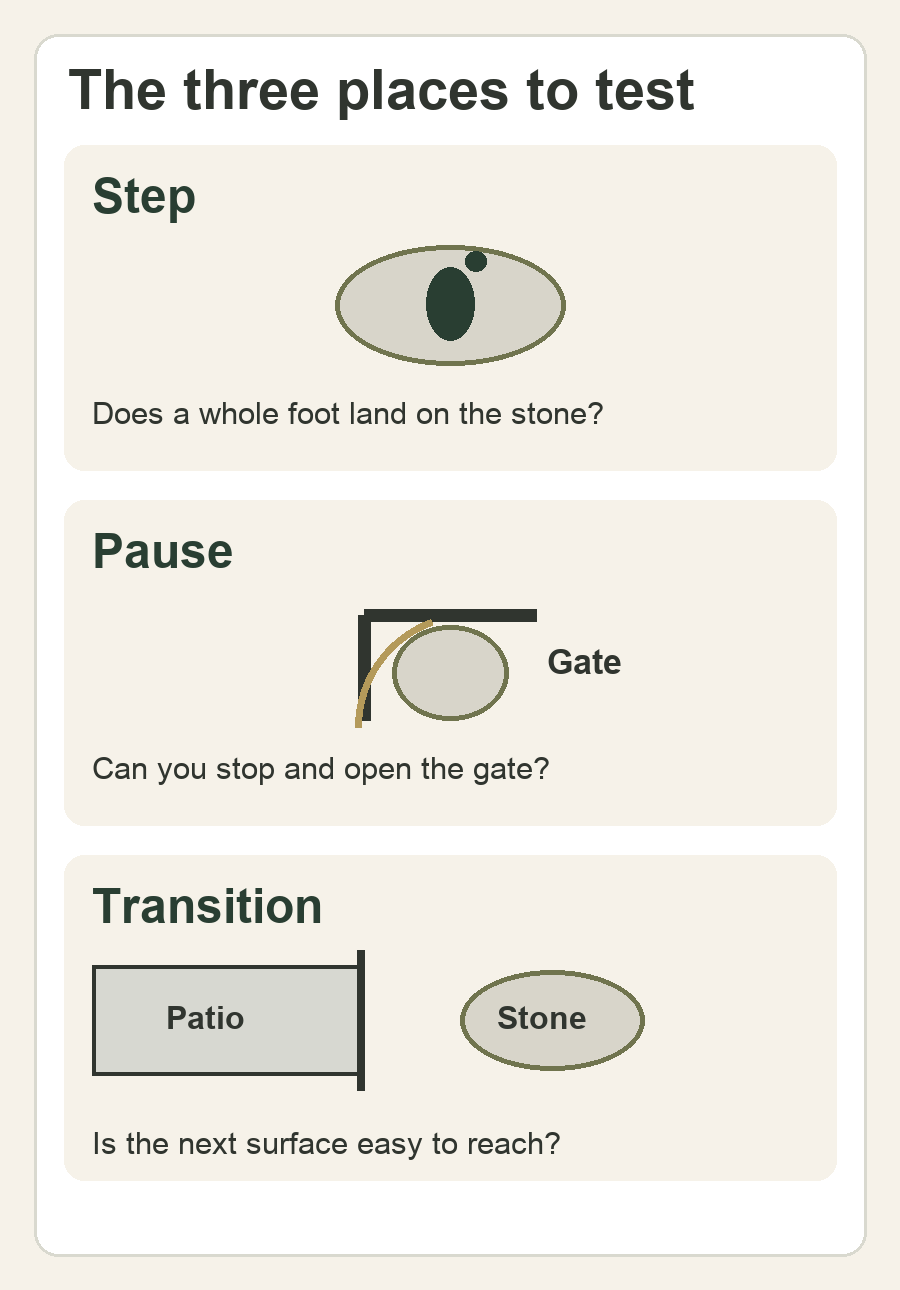
Step
Each foot should land fully on stone without stretching or shuffling. With 18-inch stones on 24-inch centers you get gaps of about 6 inches, which suits most strides. Where the path turns, one 24-inch stone is easier than two small ones.
Pause
Stop where you open the gate, set something down or step aside for someone. Can both feet rest on stone while your hands are busy? A landing about 24 by 36 inches, or two stones set side by side, at the gate latch makes a real difference.
Transition
Walk onto and off the path at the patio, deck stair, gate, lawn, gravel and the far end. The first stone off a patio should sit level with it and about one normal stride away. If you’re working toward a small paved corner, connect the path to a small courtyard with the same care you give the middle stones.
Treat every gap as working space
The gap filler decides how the path feels underfoot and how much weeding you sign up for. Pick it for that first. Color comes second.
| Gap filler | How it behaves |
|---|---|
| Lawn | Cheap and soft. Set stones flush with the soil so the mower rolls over, and expect to edge them 3 or 4 times a season. |
| Crushed gravel | Drains well and stays put better than pea gravel. Top up about every 2 years where feet turn. |
| Bark mulch | Soft and low cost, but floats in heavy rain and breaks down within 1 to 3 years. |
| Groundcover plants | Softest look. Light foot traffic only, weekly watering while they establish, and a season or two to fill in. |
| Bare soil | Free, but turns to mud and sprouts weeds. Fine only as a short-term test. |
Test groundcover at mature size
Plan for the size a plant reaches, not the size in the pot. Creeping thyme spreads 12 to 18 inches and stays 1 to 3 inches tall in full sun; dwarf mondo grass forms slow clumps in shade in zones 6 to 11; Corsican mint likes cool, moist shade. Plant plugs 6 to 12 inches apart, and check that anything you choose is hardy in your zone and gets the light it needs.
Check loose material migration
Gravel and mulch drift onto stones, the patio and the lawn, especially where feet turn and water runs. A low edging strip, about 1.5 inches tall and set so its top sits at or just below the stones, holds most of it in. Avoid any edge that stands proud by more than about 1/2 inch, which catches toes.
Resolve every surface transition
Stand at every point where the surface changes and look at your next footfall. A tidy middle doesn’t excuse a hidden lip, a stone sunk 2 inches below the patio, or a step that feels out of reach.
Recheck gate and side-passage access
Open the gate all the way while carrying your usual load. The swing shouldn’t scrape a stone, and there should still be room for bins, the hose and the mower to get through. Walk it from the other side too.
Stop at structural, drainage, or accessibility questions
Most stepping stones sit in a shallow bed of 1 to 2 inches of sand over firm soil, and that is an easy weekend job. Call in a landscaper if water pools along the line for more than a day after rain, if the path crosses a slope or meets steps that change height by more than a single stair, or if someone with mobility needs relies on it. Call 811 before digging deeper than a few inches; marking buried lines is free.
Recheck the path in wet, shady, and changing conditions
Go back out after a rain, and again in the shade the path normally sits in. Rain and fallen leaves show up problems you’ll never notice on a dry, sunny day.
Record what changes after water
Look for soft ground, puddles, splash, mud tracked between stones, and green algae on shaded faces. A stone that rocks or sinks more than 1/2 inch needs its bed redone. If the same spot floods every time, that’s a drainage fix, not a stone fix; muddy small backyard ideas covers that side.
Repeat the walk before committing
Move a template, swap in a larger shape, add or drop a stone, or straighten a curve. Then repeat the same walks, with the same people and loads. If a revision would protect the main seating area and still work in the wet, test that line too.
Compare the tested paths
Put the straight line and the curve side by side and score what happened on the ground. A layout that looks evenly spaced from above doesn’t pass if it made anyone hesitate.
| Check | What a pass looks like |
|---|---|
| Daily access and loads | You can carry a 2-gallon can or a laundry basket without looking down at every step. |
| Foot landing and stride | Whole foot on stone every time, no stretch over about 26 inches between centers. |
| Pause at gate or turn | Both feet fit on stone while you work the latch. |
| Patio, stair, lawn and soil joins | No lip over about 1/2 inch, and the next stone is obvious. |
| Gap care | Gravel or plants stay in the gaps with a few minutes of tidying a week. |
| Shade and wet ground | No rocking, pooling or slick algae a day after rain. |
Choose, adjust, simplify, or switch paths
If the straight line passes, choose it; it’s usually cheaper and easier to keep tidy. If only the curve passes, go with the curve. If both fail, try a shorter line, bigger stones or fewer turns. And if nothing works, a continuous gravel or paver path, or even no new path at all, may be the better answer.
For a long, narrow backyard, a straight run with one wider landing halfway often beats any curve.
FAQ
How do you space stepping stones in a small backyard?
Start with centers about 24 inches apart, which leaves gaps of roughly 4 to 8 inches with 16 to 20 inch stones. Then adjust with cardboard templates to suit the people who walk the path, and set larger landings at turns and gates.
Can you lay stepping stones directly on dirt?
Yes, in firm, well-drained soil. Dig out the outline so the stone sits flush, add 1 to 2 inches of sand to level it, and tamp it down. In soft, clay or wet ground, use 2 to 4 inches of compacted crushed gravel under the sand or the stones will tilt within a season.
What can grow between backyard stepping stones?
Creeping thyme works in full sun, Irish moss and blue star creeper in part shade, and dwarf mondo grass or Corsican mint in shade. All handle light foot traffic only, so keep gaps around 3 to 6 inches and let feet land on stone.
How do you stop stepping stones from wobbling or sinking?
Lift the stone, firm the soil below, and reset it on 1 to 2 inches of tamped sand so the whole underside makes contact. If it keeps sinking, the ground is too soft or wet, and it needs a compacted gravel base or better drainage.
When is a continuous garden path better than stepping stones?
Choose a continuous path for anything with wheels, like trash carts, wheelbarrows or strollers, and for anyone with balance or mobility needs. It’s also the better pick for a daily walk to the gate, which should be about 36 inches wide.
Final thoughts
A good stepping stone path is one nobody thinks about. Whole feet land on stone, there’s room to pause at the gate, and the first and last steps are easy. You can get most of the way there with cardboard.
This weekend, cut 8 to 10 full-size templates of the stones you like, lay them on the line you already walk, and carry a full watering can along it both ways. Before you finalize the layout, it helps to map sun, water flow and existing paths with University of Georgia Extension’s site-analysis guide.
Last update on 2026-10-02 / Affiliate links / Images from Amazon Product Advertising API